After bringing our Medieval History unit to a close, and following our big celebration of Core Knowledge Night, I needed to do something to excite and hold the interest of my students during the remaining four weeks of school. Earlier this year we wrote digital books on
StoryBird.com and they had a ball! It’s a great website, but I was less than satisfied with the quality of my students’ writing. They loved dragging the photos into place, but their stories seemed to be a matter of drag a picture, write a sentence, drag a picture, write a sentence. I wanted their books to be more story centered, and less illustration centered. After blogging about our experience with Storybird, Blake Williams, one of the co-founders of StoryJumper, contacted me and told me about StoryJumper.com.
StoryJumper.com is a creative writing and book publishing website for kids. It allows anyone to create and publish a kid’s book, both online and also in hardcover.
The StoryStarter Workbook can be printed off or downloaded to your computer as a PDF file.
One of the things I really like about StoryJumper is that there is a complete downloadable lesson plan for 7 step story creation. This first time, I stuck pretty close to the lesson plan. There were lots of chuckles from the class as I revealed the lists of possibilities for character building, setting, and plot structure ideas. I can see lots of opportunities to use this 7 step plan with the class. After they have learned how it works, we could build on the original plan and brainstorm possibilities of our own to get everyone thinking.
I also like the prewriting that is involved with this website, before we ever get to the computers. This seems to work better with my class, not only because the quality of their writing is improved, but we also have only nine computers to work with. This way I can rotate my authors through the computer centers, while others are still working on their first drafts at their desks.
StoryJumper lets you set up an on-line class and assigns screen names to the students, which adds to security. The teacher can decide whether to permit home access to the stories. If you choose home access, you can print off a note to go home with each student, that provides information about accessing the website, as well as a password for the child to use from home. All the teacher has to do is print off these notes. It is already done for you. To me, that is a really big plus.
After we had our writing under way, the website also provides step-by-step directions on how to build their story on the website. There is a video available, but we had trouble getting that to work. This may be due to the weak wireless internet in our building. Our wireless internet was down on Thursday, and we struggled with it again on Friday.
Once the students are working on line, they select backgrounds, props, and use text boxes to add in their writing. They can resize, rotate or flip scenes, props, and text boxes. They create a cover, dedication page, and can easily add and move between pages. Your own photos can be uploaded and used as scenes or props. We aren’t doing this at this time, but that opens up a lot of possibilities for future projects.
We are now six and a half days away from the end of the school year, and my class is totally engaged in this project. I think that’s saying a lot. Most of the problems we’ve encountered are due to the limitations of our aging equipment. We’ve had some problems with writing showing up in places we didn’t want it, but kids are helping kids, and the project is going well. I’m hoping we will have most of the story creation finished by the end of this week. I want each child to have time to present their StoryJumper book to the class during that last two and a half days of school.
Once the project is done you can decide who to share the book with. It can be kept private, shared with friends and family, or submitted to be included in the StoryJumper public library. For a reasonable fee, you or parents can also choose to have a hardcover book published. This is a great website for the upper elementary student!
May 31, 2010
Posted by Barbara Day |
Education, Uncategorized | Storybird, Storyjumper, technology, writing |
5 Comments
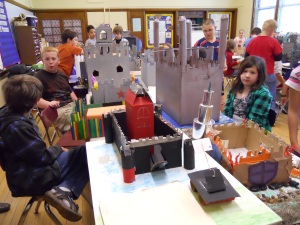
Our classroom was full of castles of every shape and size.
Thursday, May 6th was Core Knowledge Night. This is the time when we show families all the projects we’ve been working on. For fourth grade we displayed things we had done for the American Revolution and the Middle Ages. We had our Giant Medieval Paper Dolls and their letters on display in the hall. I wrote about this project in an earlier post.
After reading The Door In the Wall, each person designed their own coat of arms. There are several resources that have good information about heraldry. I like to use Medieval Times from Teacher Created Materials, Inc. Page 27 has a key to some of the symbols that were used in heraldry. You will find a pattern to use for your shield on page 28. The size of the shield we make is usually dependent on the supplies I have on hand. This year I just ran the shield pattern onto cardstock, and we have displayed them on our lockers. Other years I make them larger, and students trace a pattern onto larger posterboard or cardboard.

Each person created their own coat of arms, and we used them to decorate our lockers.
Our castles were due on Wednesday, May 5th, and they were incredible! Every child completed the project with two making posters, and the rest building models. We had castles made with cardboard, wood, sticks, sugar cubes held together with frosting, and styrofoam. They were very impressive.

A Motte and Bailey Castle
One of the girls made a motte and bailey castle. These were the earliest castles built, and they resembled our early American forts. The keep was built on a hill (this was the motte) that was often made with the dirt that was dug from the moat. The castle and bailey (the yard) were surrounded by a wooden fence. The drawback was that attackers used to burn the castles down, which is why they began building them from stone.
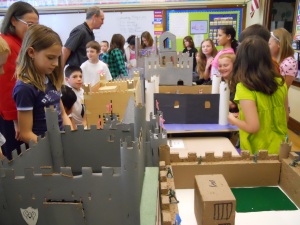
Visitors from other classes come to check out our castles.
We had lots of visitors in to see the castles on Wednesday and Thursday. All the kids were able to explain the construction of their projects. Each student presented their castle to the class. We interviewed them and asked questions about the materials used, who helped, what they were proudest of, and how their castle is like a real castle from the middle ages. I always take lots of pictures, and this year I experimented with a Flip Camera that was just acquired by our school.
On Thursday we wrote a fairy tale about our castle using the following story starter:
-
It was the day of the Core Knowledge celebration, and room 205 was full of castles. Ms. Day’s 4th graders entered the classroom, but Ms. Day was nowhere to be found. Instead, there was a very strange looking substitute sitting behind the desk. Instead of a school bag, she carried a cauldron. Instead of a Phillips sweatshirt, she wore a long black gown and cape . Instead of a pencil, she carried a wand. Her name was Miss Magica. Miss Magica put that wand to use, just as soon as the class began talking. There was a crash and a bright flash of light. It started with a tingling from your fingertips all the way to your toes, and before you knew it you found yourself shrinking so small that you could fit inside your castle. There was another flash and crash, and the wind began to blow. Your castle with you inside, had been transformed into real stone and wood, and was spinning through the air, back in time to a land far far away. Write about your adventure!
We worked all this week to finish writing and post our fairy tales on our Kidblogs. We have also included a photo of each person’s castle. You can read their fairy tales and see more of their fantastic castles by visiting
http://kidblog.org/msdaysclass/. We welcome your comments.
It’s been a very successful unit. The kids have learned a lot, and they have been enthusiastic, but I think we’re all ready to move onto something new.
May 15, 2010
Posted by Barbara Day |
Uncategorized | blogs, castles, Core Knowledge, Medieval History, writing |
Leave a comment

After drawing and coloring our Starburst Pictures, the children cut them out and we posted them on the bulletin boards.
Thursday night I saw this link for Starburst Pictures on the Teaching Ideas website and tweeted by @Cristama on Twitter. The website includes step by step directions for constructing the designs. After a crazy week wrapping up our projects for Medieval History and preparing for Core Knowledge Night, which I will write more about in my next post, we needed a change of pace.
We tried this project on Friday. We did it as part of our math lesson. After working on problem solving for a while, we reviewed geometry vocabulary; points, lines, line segments, angles, and vertices. We discussed obtuse and acute angles. (I am an expert at finding ways to connect things I want to do to district curriculum.) This activity also proved to be good practice in following directions. The step by step instructions included in the lesson plan, make this easy A few of us had to start over, because we had trouble with the directions. The kids were surprised and delighted with this little diversion from long division. Thank you @Cristama!
May 8, 2010
Posted by Barbara Day |
Education, Uncategorized | art, geometry, math |
Leave a comment

This is Lady Maria. She is a noble woman.
For the last two weeks, we have been working on our Giant Medieval Paper Doll Project. This is a group project that we do to learn about how the people of the middle ages lived. I got this idea from the February/March 1997 issue of The Mailbox–Intermediate.
Several times a year, I like to do something in the way of a research project with my students. With 4th graders, this means I bring in the books, and we learn how to use the table of contents and index to find the information we need. This year, with my new ventures into technology, we have also used the internet. Usually I order a box of books about the topic, in this case — the middle ages, from our area education agency. I also have a very large classroom library, that I have collected over the years. This year I also found some helpful websites, which I added to our
Read the Web class wiki.
As a class we learn about feudalism, and the impact this had on people’s lives. I want my students to appreciate the freedoms they have to make their own choices about their lives, so I impress upon them the lack of free choice in the structured society of the middle ages. Students sign up to study one group of medieval people. Some ideas are:
-
A monk who lives in a monastery
-
A medieval peasant woman or man
-
A Lord of the manor
-
A medieval noblewoman
-
A knight
-
A jester or minstrel
-
A merchant or guild master from the town
-
A child of the middle ages
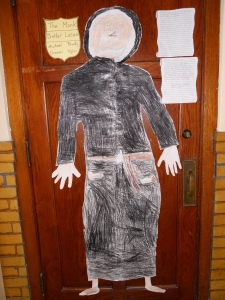
Brother Lucas is a Monk.
I always begin by having the kids do some reading about their person. We look for information about how the person lived, and what kind of clothing they wore. Here are the steps for creating the paper doll.
-
Have one group member (usually the smallest) lie down on a large sheet of paper. Bulletin board paper, butcher paper, or brown wrapping paper work well for this. The other members of the group trace his or her body to make the outline of a giant paper doll. I love watching the kids collaborate to do this.
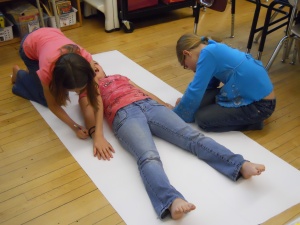
Trace around one member of the committee to get the shape for your paper doll.
-
Students research the follow information about their medieval person: In what kind of home did this person live? What did this person wear? What did this person eat? How did this person spend his or her day? What hardships did this person face? In what way was this person important to medieval society? I provide each group with a folder (remember I love using manilla folders) with a note taking form that includes questions. You can find some examples in the file cabinet.
-
After the group has answered these questions, draw eyes, hair, and other facial features on the paper doll. Decide on a name for their person.
-
Work together to dress the paper doll by drawing clothing that matches the information gathered while researching. Draw on the clothing with crayons or markers. Some people have even created a collage by adding paper or fabric scraps.

Dress your medieval paper doll by drawing clothing and accessories.
-
Cut out the paper doll.
-
On drafting paper work as a group to write a letter from your person to the class. Use the information you have gathered to talk about your person’s life in the middle ages. Be sure to write in first person. Your person is helping the people of today to understand their life in the middle ages.
-
Revise and edit your letter, and copy it on final draft paper. I use paper made to look like a scroll, but you could use anything that you like.
-
Display your letter and paper doll.
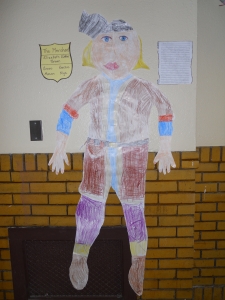
Elizabeth Esther Brown, The Merchant
May 6, 2010
Posted by Barbara Day |
Uncategorized | Core Knowledge, Medieval History |
1 Comment


