Our Castle Project for 2011
This school year I have been writing and posting on my new blog, Day In the Classroom. I recently realized that some people are still visiting this blog, so I am going to double post to both blogs. This post includes some material from a post last year about the castle project that I do with students.
Phillips is a Core Knowledge School. We are also a public school, so we teach the regular school district curriculum, and in addition we teach most of the Core Knowledge Content. Core Knowledge is based on the writings of E. D. Hirsch, author of Cultural Literacy. You can learn more about it by visiting the Core Knowledge Foundation Website.
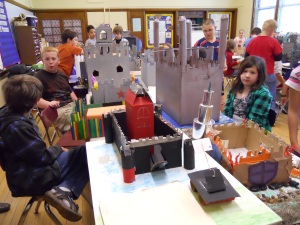
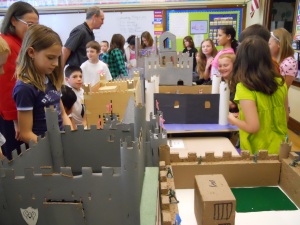
Our first graders learn about ancient Egypt, the third grades can tell you about the Roman empire, and in fourth grade we learn about the Middle Ages. As part of our study, my students build castles. We completed our castle project last week. It is completed as a homework project, and it is one of the highlights of fourth grade, or so some people tell me.
I have done this project for fourteen years. I did quit for a few years because the castles had become so elaborate and huge, and they had become “Dad Castles” instead of “Kid Castles”. I make it a point to tell families that they may assist, but it should be mostly the child’s work. When students bring their castles, we always interview them about how they planned and built their castle. When asked what they liked best about the project, many respond with something they did with their parents, so I do allow family help.
I have restrictions about the size of the final castle. It had gotten to the point that some castles were the size of two or three student desks. I now request that they are no larger than the top of a student desk.
Because I didn’t want to cause a hardship for any family, for a few years I offered the option of making a poster instead of a model. Only one or two students per year ever chose to do that. When other students asked them why they made a poster rather than model, the answer was that they thought it would be easier. Since I don’t want to offer a “lazy option”, I dropped that this year.
We begin in class by learning why castles were built, and how they were built. Castles weren’t just houses, they were war machines. We learn about the planning that went into the defense of these castles, and children are encouraged to include these details in their models.
I am a big consumer of manilla folders, and I use them for this project. I staple step by step directions for the project on the left side of the folder. You’ll can find a copy of these directions in the file cabinet. On the right side I include diagrams labeling the parts of the castle. We do several in-class lessons about the parts of the castle, and whether it was for offense of defense. I also include ideas about possible ways to construct a model. Most of my ideas come from the books, Knights And Castles, By Teacher Created Materials and The Middle Ages Independent Learning Unit, By Lorraine Conway. You can read more about the resources I use in my previous post on this blog, titled Medieval History for Kids.
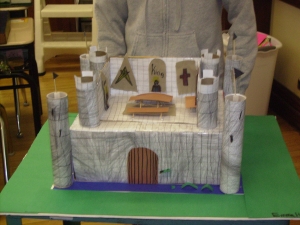
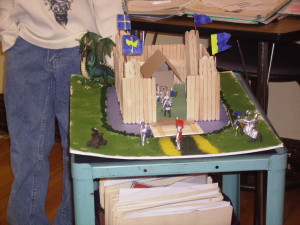
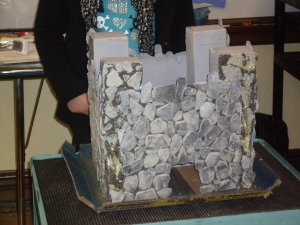
The kids and families never cease to amaze me with their creativity. I have seen castles made of wood, cardboard, styrofoam, sugar cubes, marshmallows, sand (that was not such a good idea), clay, craft sticks, and rocks. Every year, there is some new idea that I would never have thought of and have never seen before. This year one of my girls brought the mold that they used to make all the blocks that they built the castle from. She explained to us how she mixed the “cement”, formed the blocks, removed them from the mold, and let them dry. It was fantastic.
We do a lot of writing. We write about why castles were built. We write about the kids’ thinking and planning for their castle. Kids write a description of their work to be displayed at Core Knowledge Night. At the end we write fairy tales about what happens when an evil wizard shrinks us and our castles become real.
On the day the castles are due, we invite students from other grades to come see them, which is why kids come into 4th grade asking when we’re going to build castles. All the castles pictured in this post were created by my students from this year. I made this Animoto to celebrate our castles and Core Knowledge Night.
Our castles were due Wednesday, May 4th, which was the day before we had our big school celebration, “Core Knowledge Night”. Now we have them displayed in the office, library, and above our lockers.
Core Knowledge Night: Wrapping Up Our Study of Medieval History
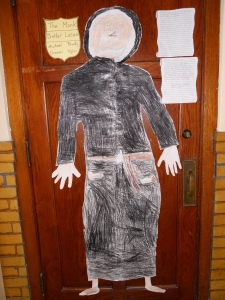
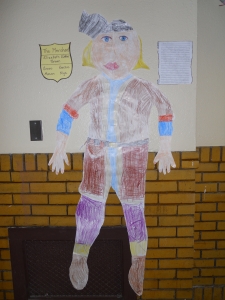
Thursday, May 6th was Core Knowledge Night. This is the time when we show families all the projects we’ve been working on. For fourth grade we displayed things we had done for the American Revolution and the Middle Ages. We had our Giant Medieval Paper Dolls and their letters on display in the hall. I wrote about this project in an earlier post.
-
It was the day of the Core Knowledge celebration, and room 205 was full of castles. Ms. Day’s 4th graders entered the classroom, but Ms. Day was nowhere to be found. Instead, there was a very strange looking substitute sitting behind the desk. Instead of a school bag, she carried a cauldron. Instead of a Phillips sweatshirt, she wore a long black gown and cape . Instead of a pencil, she carried a wand. Her name was Miss Magica. Miss Magica put that wand to use, just as soon as the class began talking. There was a crash and a bright flash of light. It started with a tingling from your fingertips all the way to your toes, and before you knew it you found yourself shrinking so small that you could fit inside your castle. There was another flash and crash, and the wind began to blow. Your castle with you inside, had been transformed into real stone and wood, and was spinning through the air, back in time to a land far far away. Write about your adventure!
Our Giant Medieval Paper Doll Project
For the last two weeks, we have been working on our Giant Medieval Paper Doll Project. This is a group project that we do to learn about how the people of the middle ages lived. I got this idea from the February/March 1997 issue of The Mailbox–Intermediate.
-
A monk who lives in a monastery
-
A medieval peasant woman or man
-
A Lord of the manor
-
A medieval noblewoman
-
A knight
-
A jester or minstrel
-
A merchant or guild master from the town
-
A child of the middle ages
-
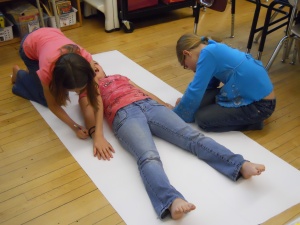
Have one group member (usually the smallest) lie down on a large sheet of paper. Bulletin board paper, butcher paper, or brown wrapping paper work well for this. The other members of the group trace his or her body to make the outline of a giant paper doll. I love watching the kids collaborate to do this.
-
Students research the follow information about their medieval person: In what kind of home did this person live? What did this person wear? What did this person eat? How did this person spend his or her day? What hardships did this person face? In what way was this person important to medieval society? I provide each group with a folder (remember I love using manilla folders) with a note taking form that includes questions. You can find some examples in the file cabinet.
-
After the group has answered these questions, draw eyes, hair, and other facial features on the paper doll. Decide on a name for their person.
-
Work together to dress the paper doll by drawing clothing that matches the information gathered while researching. Draw on the clothing with crayons or markers. Some people have even created a collage by adding paper or fabric scraps.
-
Cut out the paper doll.
-
On drafting paper work as a group to write a letter from your person to the class. Use the information you have gathered to talk about your person’s life in the middle ages. Be sure to write in first person. Your person is helping the people of today to understand their life in the middle ages.
-
Revise and edit your letter, and copy it on final draft paper. I use paper made to look like a scroll, but you could use anything that you like.
-
Display your letter and paper doll.
Our Castle Project
We began our castle project last week. It is completed as a homework project, and it is one of the highlights of fourth grade, or so some people tell me. I have done this project for thirteen years. I did quit for a few years because the castles had become so elaborate and huge, and they had become “Dad Castles” instead of “Kid Castles”. I knew things had gone too far when I overheard a conversation between two of my students who were complaining that their parents had taken over their projects. Stacy was commenting that she had her castle all planned, but her mom wouldn’t let her do it the way she wanted. Stacey’s parents were in the heating and cooling business, and her final castle was made of sheet metal, welded and assembled with rivets. Joey’s response was, “Yeah, my dad keeps calling it his castle.”
On the day the castles are due, we invite students from other grades to come see them, which is why kids come into 4th grade asking when we’re going to build castles. All the castles pictured in this post were created by my students from last year.
This year our castles are due on Wednesday, May 5th, the day before we have our big school celebration, “Core Knowledge Night”. Afterwards we will display them on top of our lockers and in the library.
Medieval History for Kids
-
The Whipping Boy by Sid Fleishman
-
Catherine Called Birdy by Karen Cushman (I edit this one as I read.)
-
The Door In the Wall by Marguerite De Angeli
-
Adam of the Road by Elizabeth Janet Gray
-
King Arthur (Scholastic Junior Classics) by Jan B. Mason and Sarah Hines Stephens.
-
Robin Hood of Sherwood Forest by Ann McGovern
-
EyeWitness Books, Castle by Christopher Gravett
-
Eyewitness Books, Knights by Christopher Gravett
-
See Through History, The Middle Ages by Sarah Howarth
-
Knights by Philip Steele
-
Stephen Biesty’s Cross-Sections Castle
-
Usborne World History, Medieval World by Jane Bingham
-
Castle by David Macaulay
-
Knights And Castles, By Teacher Created Materials
-
Medieval Times, By Teacher Created Materials
-
The Middle Ages Independent Learning Unit, By Lorraine Conway
-
Knights & Castles, 50 Hands-on Activities to Experience the Middle Ages, by Avery Hart & Paul Mantell
-
Exploring Ancient Civilizations, Medieval Times by Robynne Eagan
We are beginning our Castle Project this week. My next few posts will talk about some of the special projects we do to further our understanding of life in the Middle Ages. If you have additional ideas, I would love to hear them.


